
 |
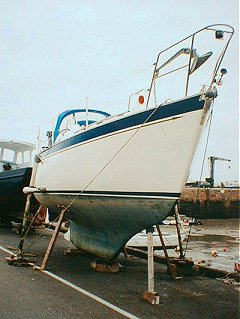
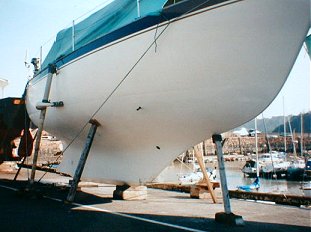
| Rusalka Mist craned out, on her legs and safely propped on the pier at St Aubin Harbour, Jersey. |
In the Autumn of 1996, when we sailed back to Jersey from our cruise along the West Country coast of England, we decided it was time to tackle various issues concerning Rusalka Mist's ample bottom.
The Boat was seven years old and our job list looked like this:
To tell the truth, this was only a fraction of the actual list we worked from - it ran to two full pages! - but these are the most interesting items.
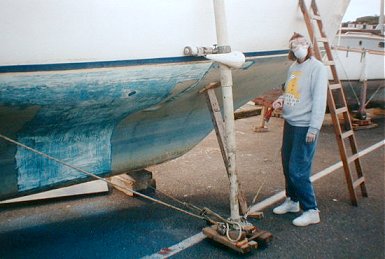 |
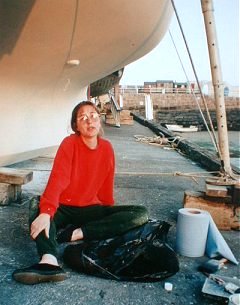
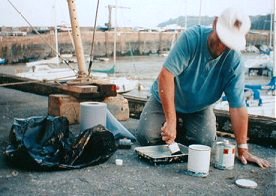
| The entire bottom needed every scrap of paint removing for the epoxy layer. We used hand scrapers. Here Nicky models a very fetching dust-mask and goggles. |
In mid September we had a last, cracking sail across St Aubin's Bay from our normal berth in St Helier Harbour to St Aubin's Harbour. It was dark when we got there on the tide. The harbourside lights from all the pubs and restaurants sparkled on the inky water as we motored gently to find the pre-arranged working berth. Silhouetted in the coloured fairy-lights it was very difficult to distinguish dozy ducks from stray mooring buoys in this tiny, crowded harbour. It is important to get it right as one will reluctantly swim from under the bow, but the other will enthusiastically tangle up your prop and ruin your evening.
We climbed up onto the bulwarks for a well-earned pint. I was back on board the next morning to disconnect the wiring from the mast and waterproof the connections. I also untaped and pulled the split pins from the bottle screws so that it would be easy for boatyard to unship the mast on Monday.
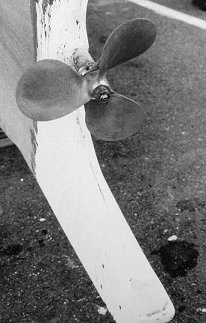 |
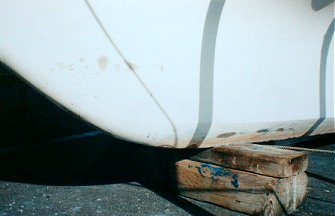
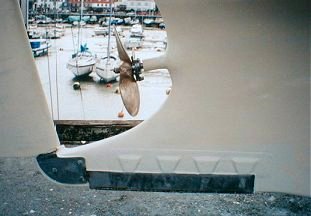
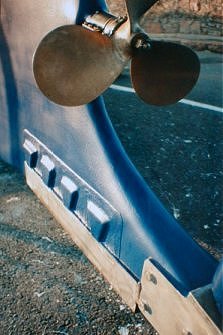
| Once the paint was clear, we could see a six-inch crack in the gel-coat bellow the propeller. Water had oozed out of this crack between tides. Oops. |
St Aubin's Boatyard is a two-man affair, tucked away in the tiny lanes behind the church in St Aubin's village. They had been recommended to me on the basis of their supreme skills with repairs and this was the aspect of the jobs that had me most concerned.
Once she was up and securely chocked, on her normal beaching legs, we began the nastiest bit of the job. All the existing antifouling had to be scraped off as soon as possible so that the gel-coat could dry out as much as possible in the months to come. Osmosis is a funny business, but it follows simple, basic rules and can be kept at bay if you know what to do. We were showing no symptoms of osmosis, but we wanted to take no chances and put some prevention in place. The surveyor had checked the moisture content three years earlier before I bought the boat, and had rated it 'very good', so I wanted to confirm this and keep it that way!
Without the protection of our old antifouling, or the daily 'pressure' of the sea water, even the winter chill and the occasional (?) winter downpour would allow most of the absorbed moisture to evaporate away. But only if we left it all exposed for several months. It surprised me how easily the first few scrapes ripped off the layers of paint and exposed white gelcoat. The novelty did not, however, last long. Nicky and I both kitted up with eye goggles, breathing masks, triangular paint scrapers and our scruffiest old clothes. We huffed and puffed, scraped and ached and sweated and swore for weekend after weekend. The filthy clothes lived in the boot of my car and ended the job in the nearest bin, the scrapers I sharpened with a file about every hour.
 |
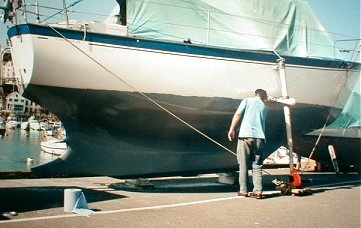
| Someone else's dodgy repairs around the cutlass bearing and prop-shaft tube. |
As the picture shows, the initial scraping removed the bulk of the old paint but did not leave us with a clean surface. More very hard work with coarse (80 grit) wet'n'dry paper was necessary to remover the blue colouration and get down to pure, white gelcoat. This work was equally arduous and I must admit that other work, inside, often seemed a more attractive option.
By the time the hull was clean all the sea-cocks were out. The unreliable gate valves (the domestic-looking stop-cocks with a red wheel-like handle) were in the bin. The solid bronze Blakes valves on the head pipes needed a 're-bore' by putting valve grinding paste in the conical seating area and working then well in a vice. Three new high quality ball valves needed purchasing: one for each sink and another to replace the rusty-looking specimen on the engine cooling water intake.
Meanwhile, exposure of the gelcoat outside was revealing three or four areas of hull damage. This was worrying in the sense that we did not know their cause. It was satisfying in the sense that now we could see the problems clearly and that the experts at the boatyard were confident that all would be well.
 |
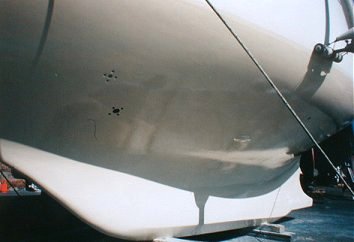
| Discolouration along the bottom of the keel where, probably, a non-marine filler had been used on some damage. |
The photos show the crack in the rudder skeg below the prop, that was oozing residual water out. We drilled to let this clear very quickly. You can see the cracks around the prop-shaft tube exit point just ahead of the prop, as well as someone's earlier attempt to fill this. We were most surprised by the areas of heavy discolouration amidships and nearer the bow on the port side of the bottom of the keel. This looked like the result of a heavy grounding, badly repaired with non-marine filler, which was losing adhesion. We drilled here too to speed drying.
Winter was getting on now, and work under the hull was becoming even less attractive. It was time to put a tarpaulin over the cabin and have a look at those drippy windows. We removed the self-tapping screws from the one above the chart table - the one that had habitually dripped on our charts on starboard tack! - and found that the seal between the frame and the cabin side was still very tacky with no sign of water damage. This could only mean one thing: the seals within the actual window assembly had gone. If one or two of our seals had gone, it was not worth wondering how long the others would last.
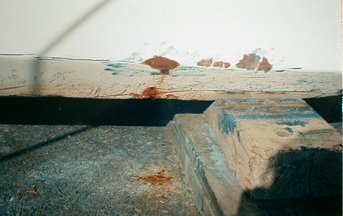 |
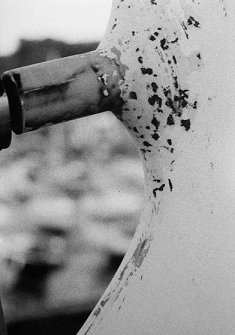
| Dirty water, dripping from this failing repair, was discolouring the tarmac on the pier before we drilled it to let the worst out. |
I had once tried to re-bed the glass in a window of another boat and it was such a sticky, wasteful, frustrating mess that I knew that this was a job for professionals. All eight windows were removed, packed up in lots of stiff corrugated card and parcel tape and despatched - after a few phone calls - to Eagle Boat Windows, 28 Arthur Street, Barnoldswick, Nr Colne, Lancashire, BB8 5JZ, England. These people had been recommended to me by fellow Vancouver owners in Plymouth. The total cost was to be £240 for the eight.
They quoted a three- to four-week turn around and were very keen to tell me of their work on lifeboat windows for the RNLI. In the end they took much longer than this, saying that they had so much work on from the the RNLI and that was all high priority. Ah, the price of success!
 |
| Clean, white gelcoat all over - at last! Note lack of sea-cocks, they are being serviced or replaced as necessary and we want to epoxy behind their mountings. |
With the windows out I was surprised by how flexible the GRP cabin sides had become. It was only a 6mm (0.25 inch) solid lay-up and now had large holes in it! Since the aluminium frames were obviously structural in this important area suddenly those little self-tappers seemed woefully inadequate. I ordered a hundred 4mm A4 stainless steel bolts from RS Components and began cutting them down to length... The inner frame surrounds needed drilling on a pillar drill and the photo shows one of them re-bedded with the "nylock" nuts regularly spaced around the inside.
With various hairline cracks working away below the water line and a dripping stainless watertrap silencer on the engine, I had been using our single pump fairly regularly during the Summer. Twenty strokes or more cleared the results of crossing the English Channel these days. One day the strum box found half the leg of someone else's jeans deep in the sump. It made me realise how seriously we depended on it. I had a WW2 brass stirrup pump somewhere in the bottom of a cockpit locker as a backup, but really, in my heart I knew that this was only one step away from useless.
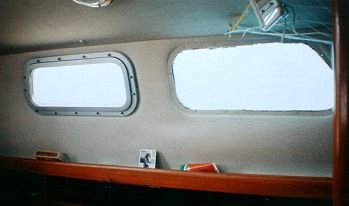 |
| The windows were sent away to be re-sealed. This shows them being replaced, note the ring of nylock around as we through-bolt them for rigidity. |
Offshore regulations require, for a 28 ft boat, two manual pumps, one operable from inside and one from outside the accommodation. I had one outside, so it was necessary to make room for the other. I decided to buy another Henderson Mk V so that spares would be interchangeable. While I was at it I ordered a Rule 3500 electric pump. I don't imagine it really would save a sinking boat, but, especially if I was single handed, it should certainly make a difference. I fitted them both in the engine compartment. The electric one as low as possible on the port side, making most of the back of the wet locker removable for access, and the manual one on the starboard side, operable from the quarter berth.
 |
| Our rudder skeg after deep and meaningful repairs, as well as stainless steel reinforcement! |
Each has separate plumbing so now there are three skin fittings in a row just below the toe rail in the hanging locker - not too close together to maintain strength. There are two one-way valves in each manual pump and another in each of the three strum boxes, but I added one in the top of the outlet pipe of the electric pump, just in case. I thought about sea-cocks for the skin fittings but they are well above the normal water line and a large part of the locker would have gone to accommodate them.
Spring was now upon us. As soon as the weather warmed up a bit the team from St Aubin's Boatyard set to work on our repairs. They dug deep with the angle grinder, found good, sound lay up in each place and then rebuilt the layup to the original level.
 |
| The first coat of epoxy gave us a first-ever chance to see reflections on the underbody of the boat. She looked lovely! |
Skilful work with a flowcoat replaced the gel-coat to an exact and invisible repair. No doubt there's more to it than that but they were finished in a couple of days and it all looked superb. They were a little concerned with the final strength of the rudder skeg, so we discussed steel reinforcement. You can see in the photo the A4 grade 'shoe' that was fabricated, welded to the rudder bottom bearing and dove-tailed into the GRP. No doubt it takes nought-point-something of a knot off our speed, but we'll always get there and its a lot stronger.
We chose Blakes two-part epoxy for the bottom. The bloke two boats down had been putting the International version on his Golden Hind the previous week and we had seen him gamely putting on the five - or was it seven? - coats that were recommended. Blakes only needed two, so we thought it would be much easier.
 |
| The gloss on the first epoxy layer reflecting the spring sunshine |
There is something quite scary about mixing the two parts and knowing that the invisible clock of the curing process has started and that you must beat it and get everything right at the same time. We had carefully masked the waterline and the delicate areas around the cutlass and rudder bearings. We had measured the square area of the bottom and calculated the coverage, but we had no other way of measuring the film thickness. Nicky was going to use a brush around the edges while I used a roller for the main bulk. We decided to put the cream coat on first.
It was a bright, windy, Easter day and I soon found the downside of the two-coat approach: the paint was thick and had to go on thick. By the time we were finished thin strings of stray epoxy had blown all over both of us, our transistor radio and the tarmac. But the boat looked lovely. You don't often see the beautiful curves of your underbody highlighted with such a gloss! And gloss it was. We had no trouble finishing within the cure time. The temperature was a bit low and this gives you more time to fiddle, but surface tension does most of the work and the finish was nearer to perfection than I could have hoped.
We had bought the required solvent which would remove the epoxy before it cured. Nicky set about cleaning-up but we soon found that the effort, pollution and cost involved would not outweigh the loss of the equipment so we gave up and simply binned the brushes and roller that we had used. The roller tray we left to harden and reused it the following week. Knowing the mess you can get if pressure-sensitive masking tape is left in the sun, we removed all the masking carefully just as the epoxy was curing. Our new friend, surface tension, took over and provided a nice, rounded, feathered edge.
 |
| Nicky gives up trying to clean the epoxy from brushes and rollers. It will probably cost more in thinners than the price of new ones! There's only one more coat to go on... |
The next weekend was just as sunny and not so windy. We were now old hands at this epoxying lark so we went down full of confidence and happy to be getting on with it at last. We wiped everything over and masked off just an eighth of an inch (3 mm) further up, so as not to build up a noticeable edge. Everything went well and the second, grey coat was on more quickly and with less mess than the previous one. It looked just as good and we threw away our roller and brush with abandon this time.
The next job was a primer for the Blakes antifouling. This was a normal paint (i.e. one that dries by evaporation) and, like the second epoxy coat, it had to be put on within a specified time-window. All times are variable depending on temperature, but we had calculated that our normal weekly schedule would be suitable. The paint went on with no trouble although it was a shock to find ourselves having to clean the brushes for a change!
 |
| The second, grey, coat of epoxy went on easier than the first, and looked just as good. |
When I went down to look at our handiwork after work during the week I had a shock. Most of the primer under one side had split and cracked along the lines of the brushstrokes. It had pulled back and the grey epoxy was shining through the cream primer. It looked a mess! What had happened?
I phoned the local supplier of Blakes (Paul Battrick, at that time of Iron Stores Marine, now running South Pier Shipyard, both in St Helier) and it turned out that we had put the primer on a little too soon. The side which had suffered was indeed the shady side and our temperature estimates had not taken account of the importance of Spring sunshine in combating the chill of the Spring air in these climes.
 |
| Nigel in his painting gear. |
"No problem", Paul reassured me, "Just put a second coat of primer on where it's needed." Luckily the painting clothes and everything else was still in the back of my car so I did as suggested, immediately.
We had extended our work with the epoxy etc. up through the area that used to be boot-top. Our decision was to paint the whole bottom, this time, with Blakes Hard Racing Antifouling, which Paul assured us was in fact very similar to Blakes boot-top paint. This would raise our painted waterline by about two inches (50 mm) but add protection to the hull. We must remember now, when loading the boat, that we have raised this.
 |
| Delight in the gleam of Blakes Hard Racing antifoul paint in the evening sun |
The rich, dark blue paint was such a joy to put on that the job was soon over. A second similar coat went on in the week. It was such a joy not to be having to do this between tides, on the mud of St Helier Harbour. The photo shows how beautiful she looked in the evening sunshine.
There were a lot of things left to fit and refit as soon as the antifouling was dry. I had made new 12 mm (1/2 inch) marine ply "washers" for all the sea-cocks, by drilling with two different sized hole saws. These are very necessary because of the way that, should a fitting start to weep, the wood will absorb water, swell and automatically re-seal. They help spread the load against the GRP as well.
All the sea-cocks went in with no problem. I had greased the Blake's ones, and I re-used the water strainer on the new engine cooling inlet. As I said above, I replaced both the sink valves with larger ball valves. Drilling out the holes in the hull could have been a problem. I solved it by gluing those emergency softwood plugs into the existing holes. When the 5-minute Epoxy was hard I sawed off the plug from outside and then used the hole-saw to drill the bigger hole.
A mug of boiling water is essential to soften hoses for fitting them back. You must not use any sealant on flexible hoses. I used two high quality, stainless steel jubilee clips per fitting.
 |
| Gently... Gently... |
The log impeller was no problem to refit. The zinc sacrificial anode was replaced, refitted and re-wired to the engine. (My galvanic corrosion plan is not fully formed yet. There are many issues to consider.) We had bought a rather splendid, large, sintered-bronze earthing plate from Cruisermart to earth the short-wave radio transmitter. New holes for this had to be drilled (after very careful measurement and double-checking!) and it went in on its vast bolts. It looked like an ingot of solid gold against the blue hull in the Spring sunshine!
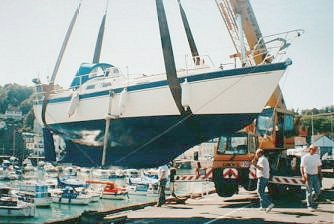
The system at St Aubin's is that the three boatyards involved arrange a large road crane for two days each year, one to take all the boats out and then again to put them all back. The relative size of the boats, the crane and the pier mean that they have to come out and be placed in order, then go back in the opposite order.
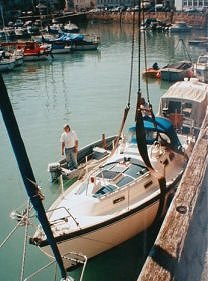 |
| Afloat at last. The boatyard men are checking that all the sea-cocks are water tight immediately |
This all means that the day for refloating comes around whether you are ready for it or not. Our last few jobs had been so satisfying that we had hardly noticed that we were rushing through them. We were in fact all finished in good time. St Aubin's Boatyard left it to the last day or so to fit our new plastic Vetus silencer and water trap.
I rushed down after work just in time to see the crane swing her up in the air and gently over the side. Boatyard men went on board quickly to check my work on the skin fittings. All perfect. The crane was cast off and the boatyard lad in the dinghy towed her away to a temporary berth. That's when I remembered the signwriting: she had no name on the transom ! I wrote "Rusalka Mist - Jersey" in felt-tip on a piece of melamine and rowed out to tie it to the push-pit. At least she was legal as well as beautiful !
The boatyard put the mast back up a few days later and she was ready to move back to her berth in St Helier at the weekend. What a Winter!
