
In one way, you can grade the importance of gear on the boat by judging if it does things which cannot be done in any other way. For example, automatic self-steering steers the boat, but so does an electronic auto-helm and, of course, so can we. This is good back-up. Solar panels charge the batteries, and so does the engine when it's running. The GPS finds our position, but so can conventional navigation with hand-bearing compass or sextant. But what about visibility of passing ships in fog? You can sound the horn and listen. You can wear your lifejacket... Keep a good lookout... Strain your eyes for hours into the inpenetrable whiteness... Fog at night???
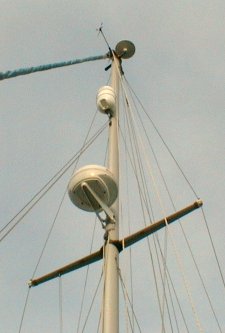 |
| The Radar's Scanning Antenna mounted on the front of the mast. Above it you can see the radar reflector, then the television antenna and the wind sensing instruments. |
There is no doubt about it. As an aid to navigation (finding the bearing and especially the range of charted objects) and for collision avoidance in poor visibility, radar does things that no other equipment or person can do. I had had one of the cheap, miniature radars on the shopping list for some years. When, in early 1998, Raytheon (aka Autohelm) sent me a brochure about their latest Pathfinder Radar which uses the latest, low-noise microwave receiver technology as well as the latest embedded computer techniques, I was hooked. I know about some of the advances that have been made in both fields, including GaAs FET amplifiers, MIMICs and huge advances in microprocessors. Raytheon are a well-respected company with military, civil and consumer product experience so I felt the time had probably come to shell out some more cash on safety equipment. You start to become your own insurance salesman at this point: "Suppose you are out there, in shipping lanes, one foggy night... Straining every nerve into the blackness... Imagining the huge bow of a super-tanker looming over your head every five minutes... For hours... Can you afford not to spend this measly £1000 on the safety of your loved ones..."
My old friends at Telesonic Marine, Southend-on-sea, did me a very good price and delivery and soon I had the display working in 'simulator-mode' on the kitchen table. All that was needed now was to get up the mast with the drill and pop-riveter to fit it all to the boat.
There were a few problems to overcome. One was getting up there. I could enlist a few friends to help Nicky with the winches but I know what hard and demoralising work winching a dead-weight in a bosun's chair up and down a mast can be. This would involve multiple trips above the spreaders with various tools and bits before the job was done. So, armed with a photograph from one of Robin Knox-Johnson's books about Arctic sailing, I set about building a rope ladder, which I hope will have many other uses in the future. I turned the rungs on Helen's wood-turning lathe out of solid ash and bound them 15 inches (38 cm) apart into a length of 12 mm (0.5 inch dia.) polyester rope doubled around a thimble. This was slow and thankless work, but gradually the ladder grew to the point where I could reach the required height. One day I will finish it to the point where it reaches the mast-head.
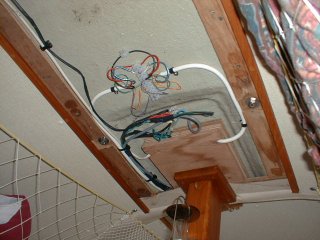 |
| The junction between the two halves of the radar cable. This is below decks, above the ceiling panels to keep it dry and safe. |
The first day came and I kitted myself out with the ladder to climb, a sailing harness for a safety rope and the bosun's chair to sit and work in. Three halliards were in use but I didn't want to take any chances. I began with a 3/4-inch twist-bit in a wood-brace and slowly cut a hole into the front of the mast for the cable. It's amazing how thick is the aluminium that the Kemp (aka Seldèn) mast is made from. Just below this twelve smaller holes were needed for the pop-rivets to hold the mounting bracket on. These went through with a re-chargable electric drill. We were working on Rusalka Mist's drying mooring so had no mains electricity. Riveting the bracket on and fishing a messenger-line through the mast for the cable took the rest of the first day and during the week I drilled through the deck and fitted a cable-gland.
The next weekend we gathered the team again, fed through the thick and expensive cable and then bundled up the radar scanner in a large off-cut of fine (1/2-inch) polyester net for it's journey up the mast. I sat in position and helped keep it from hitting the mast while Nicky and our friends hauled it up to me slowly on a fourth halliard. When it was above its bracket they lowered it gently while I desperately tried to get at least one of its four mounting bolts into place. Once two were in, it couldn't go anywhere so I set about cutting off the netting and bedding it down properly. The next thing was to take off the huge lid and terminate all the little wires as required. Most of them had proper little plugs and sockets which I greased to keep the damp out and hey-presto. Cable protectors, made from lengths of suitable, split plastic hose, went where the cable passed in and out of the mast and all was complete.
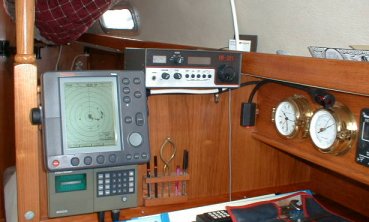 |
| I decided to modify the mounting bracket for the radar display so that it fitted nicely above the chart table. Looking at it now, I don't regret this bold move. |
At the chart table, mounting the LCD display was proving problematic until I decided to take the bull by the horns and shorten the heavy-duty bracket supplied for the job. I re-built the tilt-adjusting ends a couple of inches nearer to the bulkhead than the designers had intended and that was solved too.
I had decided to make a single joint in the cable below decks and above the ceiling panels to allow for pulling the mast in the future. This should remain dry and reliable in a way that deck-mounted plugs and sockets never can. The scale of the cable and this junction can be seen in the photograph. Some of the cable-cores are individually screened so care is needed to get everything right. I have used no junction box or enclosure because these can become damp-traps in themselves.
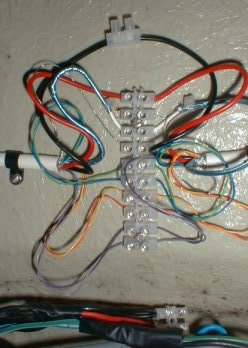 |
| Some of the conductors inside the radar cable are, themselves, screened, so some care is needed to sort out this cable junction. |
As soon as all connections were made, impatience had the radar powered immediately and it all worked perfectly. It was a dark and miserable night in early 1998 and I spent the rest of the evening marvelling at this new view of my surroundings on the screen.
My first worry was that the whole display was distorted as the harbour walls seemed to taper towards each other in front of the boat. When I checked large-scale charts of St Helier's Old Harbour, I found that this is exactly what they do. I had used the harbour for five years and never noticed before!
Then I noticed a large, vague target about three miles to the south-west. I wondered if this really could be The Mincquiers ('The Minkies'), a large granite reef south of Jersey. I checked the charts and found that it was far too close. I was again disappointed, wondering if I would ever be able to trust radar ranges on this set. Next time I looked, the echo was only about 1.5 miles away. Not only inaccurate, but a lot of drift too! No, a few minutes later it began to rain and then to pour down. This had been an approaching storm and the radar was tracking it perfectly.
In use at sea it has proved just as accurate and reliable and has even showed up plastic lobster-pot buoys on a calm day (it actually shows the 'hole' in the sea, not the plastic buoy). It seems very accurate and reliable. I have yet to use it in thick fog, but I am sure it will earn its keep very well indeed.
